![]()
![]()
This is an order that requires product creation from purchasing team. the idea is to have the sales team use existing "generic" products to capture the order and then a purchasing manager or buyer works the order by creating the specific product needed as determines by the salesman order notes. This method works on both the SOI and the POS.
Note: Contact CORESense support to request setup for special fields such as Sales Notes. You will also need to create the generic product so that is available in the SOI and/or POS.
| Step | Action |
|
1 |
From the SOI locate the customer in search or add the new customer information. |
|
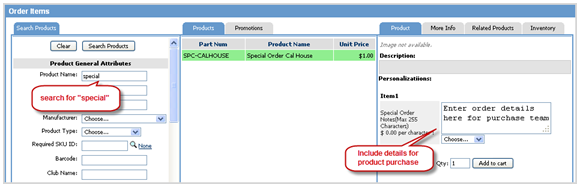
2 |
Search for the Special Order product and enter details in the Notes field for purchasing team. |
|
3 |
From the Order Items screen, select the generic product (or Special Order product).
|
|
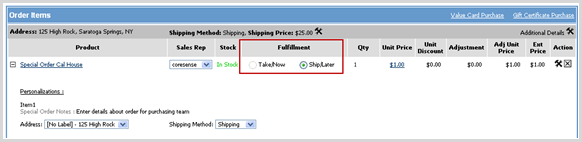
4 |
In SOI Order Items, verify that the Ship/Later dial is selected.
|
| Price | |
|
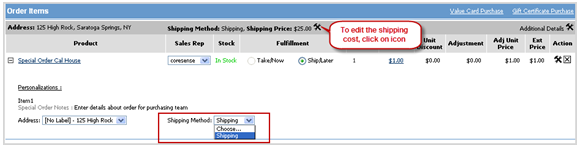
5 |
Select a Shipping Method from the drop-down list. To edit the shipping cost, click on the hammer/wrench icon and enter a price and the click on it again to save it.
|
|
6 |
Apply any required deposits in the Payments window.
|
|
7 |
Click on Complete Order button to submit order for processing. |
|
8 |
Generate invoice for receipt. The system will mark the order as Ready to Process until automation recognizes Special Order designation. |
|
9 |
Once Automation runs (every 30 mins), the special orders will move into a Manual Fulfillment status in the Order Manager. Search on that order status to locate any special orders that need to be processed.
|
|
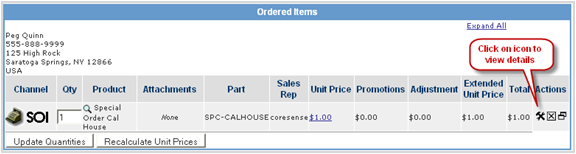
10 |
Open the order and click on the hammer/wrench icon to view order details.
|
|
11 |
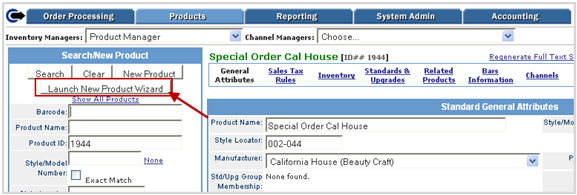
Based on special order details, create the new product/SKU using the New Product Wizard in the Products tab.
|
|
12 |
In wizard enter the minimum information for Step 1: Product Name: Style/Model Number: Product Type: Manufacturer: Description: enter notes from Special Order Notes and include Order # Sales Tax Rules |
|
13 |
In wizard enter the minimum information for Step 2: SKU: Primary Vendor: Short Description: Manufacturer: Vendor SKU: Default Fulfillment: Wholesale Cost: Weight: |
|
14 |
In wizard enter the minimum information for Step 3: Check active Channel |
|
15 |
In wizard enter the minimum information for Step 4: Master price: |
|
16 |
Click Save as Active to create the new product so that it can be assigned to the original order. Make note of the Product ID. |
|
17 |
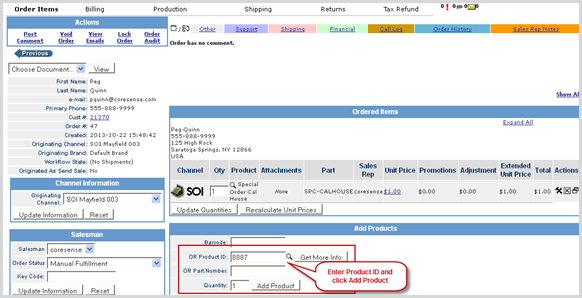
Open the order in the Order Manager. In the Order Items section, add the new product to the order by entering the Product ID and click on Add Product button.
|
|
18 |
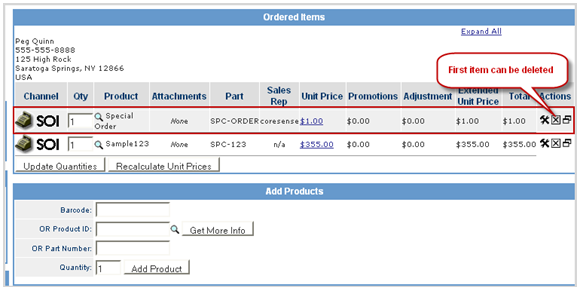
Click on the Order Items tab again two view all order items.
|
|
19 |
Clock on the X to remove the original special order line item.
|
|
20 |
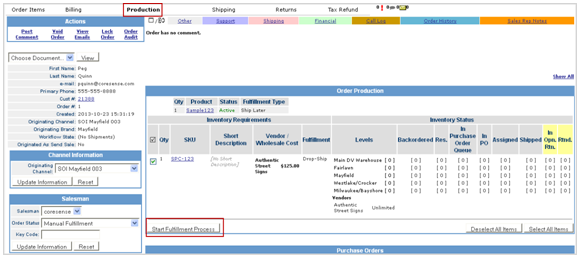
Click on the Production tab to initiate manual fulfillment. Click on the Start Fulfillment Process button to access the PO Wizard.
|
|
21 |
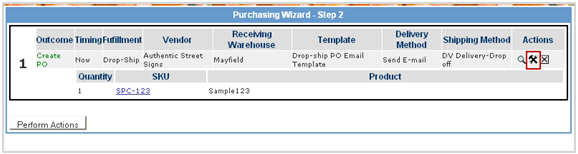
Verify and make any needed changes to the PO creation by clicking on the hammer/wrench icon. This might include change in fulfillment type, Timing, Receiving Warehouse, etc. Click Perform Actions when complete.
|
|
22 |
The completion screen displays result on whether you sent PO Now or sent it to the PO Queue. If sending to the PO Queue, generate the PO as you normally would. |
|
23 |
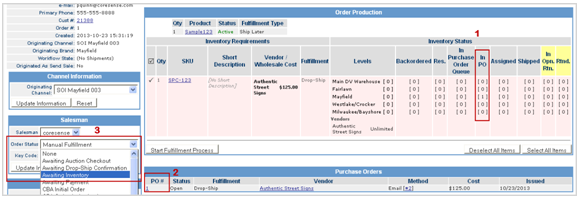
In the Production tab of the order, the system shows that the item is in PO (1) and identifies the PO # (2). Change the Order Status to Awaiting Inventory (3).
|
|
24 |
If there is any remaining balance due on the order, collect the additional funds from teh Payment block under Billing per your store policy. |
| Step | Action |
|
1 |
From the POS locate the customer in search or add the new customer. |
|
2 |
Search for the Special Order product and enter details in the Notes field for purchasing team. |
© 2023 CORESense · info@coresense.com · 125 High Rock Avenue, Saratoga Springs, NY 12866