![]()
![]()
The Email Manager is a tool used to manage customer responses to CORESense-driven email communications. This function is useful for those who are not managing customer communications through their corporate email system. It is accessed from the Back Office tool bar by clicking on the envelope icon.
There are three basic components in leveraging this tool:
To setup communication using the Email Manager you first need to setup a DNS email that is then sent to MailGun.org MX accounts. These accounts are mapped to CORESense so that email can be imported into your department mailboxes. This initial setup requires tasks from both CORESense and the client.
CORESense support will provide the record information (click here for example) for the following steps:
To support outbound emails from the website and Back Office:
To support inbound emails into the Back Office:
There are two Technical configuration tables that support the Email Manager: Mailboxes and Email Groups.
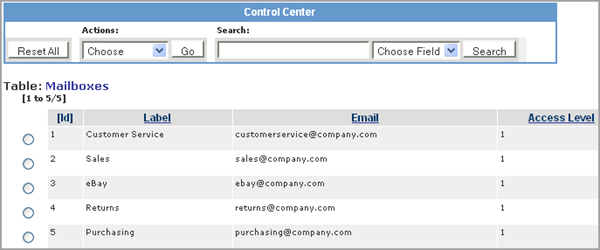
The Mailbox table is where you identify which email addresses are to be assigned to each department (i.e., customer support, purchasing). Any emails sent to that email address will be put in the Category (aka Label) with the corresponding Label.
Go to Setup> System Settings > Technical Configuration > Mailboxes to insert the company email addresses that you want assigned to each mailbox department.
It is recommended that you not use a personal email but instead use a generic department email such as, support@company.com. Sample mailboxes are provided and can be edited from the Actions drop-down or you can create new mailboxes using the Add action. You can also edit the Label to meet your needs.
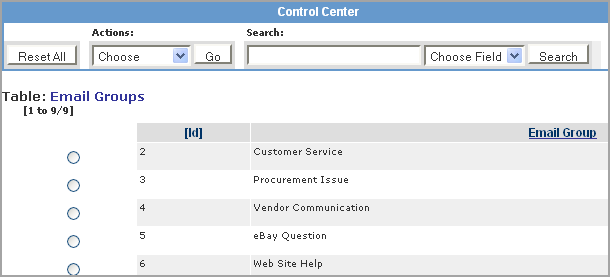
Categories are labels used within the Email Manager to organize and group the different types of information about an email for internal reference. Go to System Settings > Technical Configuration > Email Groups to customize your email group categories. These categories function as only labels that are then made available in the Email Manager.
Messages and alerts appear in the Message Center and are communications between users in the system. You can open the Message Center by clicking on the speech bubble icon  or
or  icon to see the alerts assigned sent to you. You can also create messages or alerts in this pop-up window by clicking on the appropriate icon. If you hover over the icons in this window, it tells you what each of the icons do.
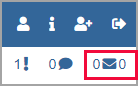
The numeric value (0) represents the following for each icon.
Alerts () : number of new alerts for the logged in user.
Messages (): number of new messages for the logged in user.
Emails ( ): First number is count of open emails assigned to the logged in user and the second value is the number of unassigned emails in the system.
Once you have your DNS and Mailboxes setup, you can use the Email Manager to respond to and track communication sent from your Back Office to customers.
|
Step |
Action |
|
1 |
Click on the envelop icon on your Back Office tool bar to access the Email Manager.
|
|
2 |
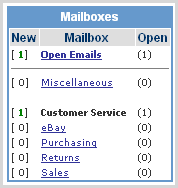
Go to the Mailbox list to select a department to review. The number of emails in each mailbox is identified under the New and Open columns. Any unopened emails are listed under the New column.
|
|
3 |
Any email in the selected mailbox is listed. Assign an owner, category or priority as needed to each email.
|
|
4 |
You can move an email to another mailbox by selecting a mailbox from the File Selected to drop-down list.
|
|
5 |
Click on the email Subject link to view original email contents. |
|
6 |
Click on the envelope under Actions to view and respond to an email. |
© 2023 CORESense · info@coresense.com · 125 High Rock Avenue, Saratoga Springs, NY 12866