![]()
![]()
Setup your zpl compatible label printer per instructions provided by the manufactiurer. The printer should be setup with a static IP address and as a networked printer.
Follow the steps below to configure the CORESense Back Office to enable the new printer. NOTE: Not needed for USB connected printer.
|
Step |
Action |
|
1 |
Go to Setup>System Settings > Products/ Labels. |
|
2 |
Set Enable Label Network Printing to ON. |
|
3 |
Under Label Printer IP Address add the Network Printer including Printer Name, IP Address and Port. |
CORESense has integrated with a service called PrintNode to facilitate label printing from the backoffice.
You can sign up for a account at PrintNode (https://www.printnode.com/en), and then download and install their client to the PC with the printer attached (i.e., the shipping station computer). Their software runs on Mac, Linux and Windows, and you can print using any browser. You don't even have to be using the computer that the printer is hooked up to. Current Plan and Rate options for PrintNode can be found here https://www.printnode.com/en/pricing.
1. Visit https://www.printnode.com/en and create an account
2. Download and install their client to the PC with the printer attached (i.e., the shipping station computer)
3. In the CORESense back-office go to Setup > System Settings Manager > Integrations > PrintNode. If you do not see the PrintNode tab, please let CORRESesnse Support know which user is trying to access this tab, as it granted via a user permission (System Settings Manager - PrintNode).
4. Create a PrintNode Account using the API Token you get from PrintNode. You may enter in a "Label" of your choosing.
5. You are now ready to print labels using PrintNode
6. When printing labels In the Shipment Manager, the user must click on the "Print FedEx Label" Link. You will see a new option in the pop-up window called "PrintNode Printer". By default, this is not selected. If it stays unselected, printing will happen the old way. If you choose a PrintNode printer, it will print to the printer selected using PrintNode. If you don't see any options in the drop-down, your PrintNode account setup in #1 above was incorrect, or you have no printers attached to your PrintNode client. To make it so you don't have to select the PrintNode Printer every time, the system remembers by browser what your last selection was. This is so different shipping stations can have different default printers. Just by selecting a PrintNode Printer the first time, should make it default on subsequent printing attempts.
For each label designed and exported to the printer, you are required to create a separate label format in the CORESense Back Office.
|
Step |
Action |
|
1 |
From the desktop, go to Setup>System Settings > Products/Labels. |
|
2 |
Click New Label Format. |
|
3 |
Enter the Label. This is for informational purposes only. |
|
4 |
Do not check the Support XML checkbox. |
|
5 |
Enter the Printer Format File. This should be "E:" + "label filename w/o .lbl" + ".zpl". For example, "E:4_6_default_location_label.zpl".
|
|
6 |
From the drop-down box, select the Type.
|
|
7 |
Click Edit Field Mapping. This enables you to define the mapping of the Back Office variables to the Text and Bar Code objects defined on the label you exported to the printer.
|
|
8 |
Before you create the mappings, you are first required to enter and print the mapping example which includes the IDs of each object. To print the mapping example:
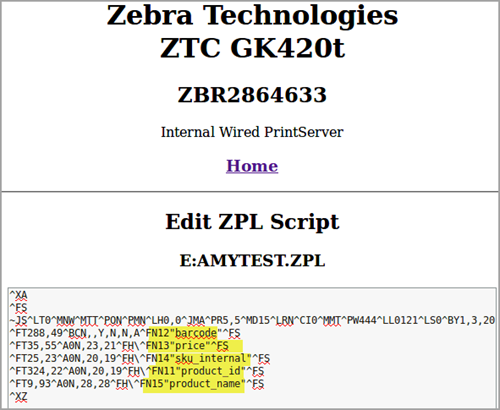
From the printer sample, there should be a series of numbers that display. These are sequence identifiers and will be mapped to CORESense fields in this step. |
|
9 |
You can also access the field IDs from within the .zpl file. Open the file and there is a line for each field name, the ID is the number preceding the field name (see highlighted example.)
|
|
10 |
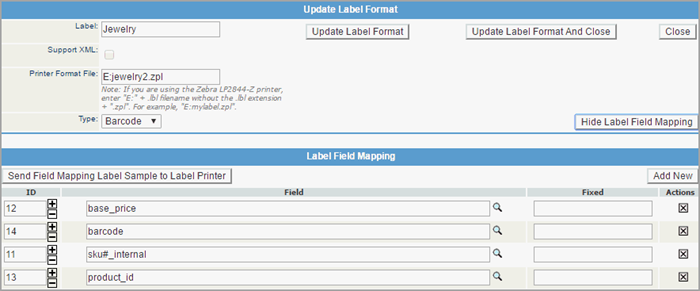
To map these fields, click Add New.
|
|
11 |
Enter the sequence number and select a field by clicking the magnifying glass. If you are entering a fixed label (i.e. base_price_label), enter the label name in the Fixed column.
|
|
12 |
Repeat the previous step for all fields. It is recommended you periodically click Update Label Format at the top of the window to save your work. This saves the label format. |
|
13 |
Once finished, update the label format and close the window. |
|
14 |
To set this as your default barcode or location label, select it from the Default Barcode Label Format or Default Location Label Format system setting drop-down, and then click Apply. |
|
15 |
You are now ready to perform your first test print from the Back Office. To print a test label, go to the Barcode Manager or Warehouse Manager in CORESense:
|
© 2023 CORESense · info@coresense.com · 125 High Rock Avenue, Saratoga Springs, NY 12866