![]()
![]()
Aa transfer has to be received at its destination in order for the inventory to be moved from the source location to the destination location. When the transfer is marked as received, the quantity received automatically updates the physical inventory count for each SKU in the new location.
|
Step |
Action |
|
1 |
From the Transfer Manager, enter a transfer number to open that individual transfer, or you can Filter transfers based on the destination location. This provides a list of all transfers for a given location. Click Search.
|
|
2 |
Click on the
|
|
3 |
Select the Receive link to open the Receiver screen.
|
|
4 |
In the Receivers-All box, click on the New Receiver button. The system prompts you to confirm the action, click OK.
|
|
5 |
The receiver is created and a ‘This receiver was created without an ASN’ comment is added to the Receiving Inventory screen.
Note: ASNs do not apply to transfers, only POs. |
|
6 |
Click the arrow beside each line item to receive the whole amount sent. If a partial amount of inventory was received, manually enter the number received in the Quantity field. Click the Receive button to update the amount and the status. The color coded text identifies if there is a match or shortage in the receipt.
|
|
7 |
The color coded text identifies if there is a match or shortage in the receipt.
|
|
8 |
Click Print Barcode to print barcode labels prior to putting away the products in the warehouse.
Note: A barcode label can be printed before or after receiving a SKU. |
|
9 |
Select the Receiver Put-Away for Transfer option from the Template drop-down list and click Generate.
|
|
10 |
Print the Put-Away document and complete receipt process. The Put-Away document(s) is stored under the Document link of the Transfer Manager.
|
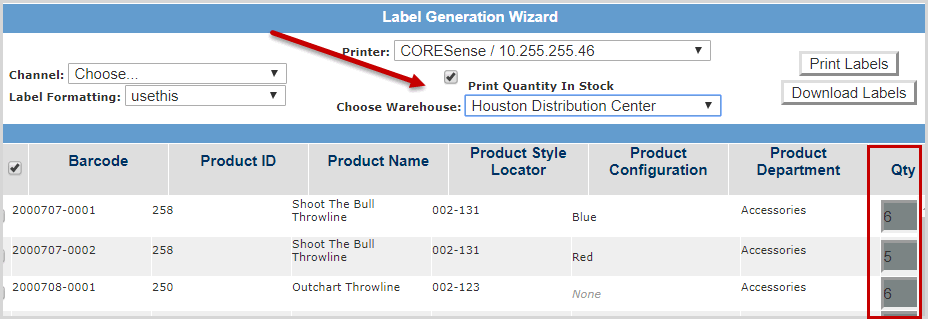
Barcodes can be printed during the transfer receiving process from the Label Generation Wizard.
|
Step |
Action |
|
1 |
From the Receiver, enter the quantities received from the transfer and click on the Print Barcodes button.
Print Barcodes button: Prints barcode label for quanitty of each SKU on the transfer. Print Received Items button: Prints barcode for recieved quanity of each SKU on the transfer. |
|
2 |
|
|
4 |
Check the Print Quantity In Stock box to print quantity based on an individual warehouse's current inventory. Choose the warehouse to print that inventory. NOTE: Using this function grays out the Qty field since the system is using the inventory count as the quantity.  The Download Labels is a method to download the .ZPL file for your selected labels. |
© 2023 CORESense · info@coresense.com · 125 High Rock Avenue, Saratoga Springs, NY 12866