![]()
![]()
Path: Back Office > Products > Warehouse Manager > Sub-locations
This section explains how to create the actual warehouse locations in which inventory is stored. CORESense enables you to create individual locations one at a time, or in batch using location templates. A template must be created first, which provides the hierarchical values in the Type drop-down in the new Sub-location pop-up.
When creating locations, it is recommended you begin by creating the largest locations first, for example, the "Aisle", and then work your way into the smaller locations such as the "Shelf" and "Bin".

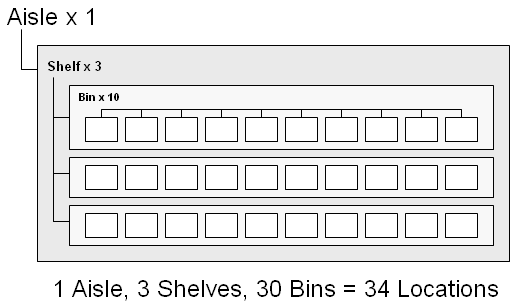
If you are using location templates, the smaller locations can be created automatically when creating the larger locations using the child auto-generation option. By using an Aisle template to create warehouse locations, you can create 34 locations for each aisle automatically by selecting the child auto-generation option. For example, by creating 10 aisles, you can create 340 locations in a single click.

Follow the steps below to add a new location to a warehouse.
|
Step |
Action |
|
1 |
From the Warehouse Manager header, click Sub-locations link and click on Add New.
|
|
2 |
In the New Sub-location window, enter the requested attributes.
|
|
3 |
Automatic Label Generation enables you to automatically generate location labels for the selected location template and associated quantity.
|
|
4 |
Click Verify to submit. |
|
5 |
The New Sub-location window appears and enables you to modify the location labels.
|
|
6 |
Click Verify to submit or Go Back to change the Location option. |
|
7 |
Click on Create These Locations to implement them.
|
|
8 |
Repeat Steps 1 - 6 until all desired locations are created. |
|
9 |
The new locations are now listed under the Sub-locations box.
|
Once created, you can perform any modifications to locations such as deleting locations, or designating them as unavailable for fulfillment, which makes inventory unavailable to sales channels for reservation and orders for fulfillment. Basically, making the inventory unavailable for sale.
|
Step |
Action |
|
1 |
From the Warehouse Manager header, click Sub-locations link.
|
|
2 |
Click on the
|
|
3 |
Update any of the General Attributes as needed and click Apply.
|
Barcodes can be printed from a warehouse sub-location using the Location Label Generation Wizard.
|
Step |
Action |
|
1 |
From the Warehouse Manager, select the sub-location and open from Hammer/wrench edit mode.
|
|
2 |
Click on the Launch Location Label Generation Wizard button. |
|
3 |
|
|
4 |
Check the Print Quantity In Stock box to print quantity based on an individual warehouse's current inventory. Choose the warehouse to print that inventory. NOTE: Using this function greys out the Qty field since the system is using the inventory count as the quantity. 
|
© 2023 CORESense · info@coresense.com · 125 High Rock Avenue, Saratoga Springs, NY 12866