![]()
![]()
The receiving process involves looking up a PO and then identifying whether it has an ASN or not. Click the links below to learn more.
Path: Inventory > Purchase Order Manager > Receive
Receiving is initiated in the CORESense Back Office once a Purchase Order has been created. This process is managed using the Purchase Order Manager.
|
Step |
Action |
|
1 |
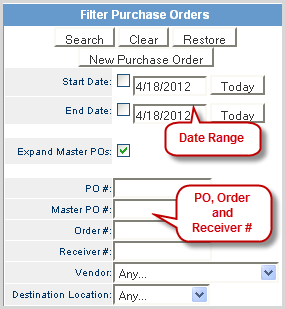
The Purchase Order search contains multiple criteria including Destination Location, CORESense ASN or Vendor ASN. You can also search by Purchase Order number. This filtering capability narrows your list of Purchase Orders.
|
|
2 |
After entering your criteria, click on the Search button to view the results. Locate the PO# you want to review and click the PO# link.
|
|
3 |
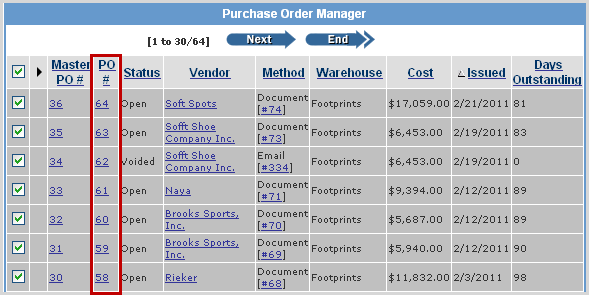
From the PO# General Attributes screen, click on the Receive link to access the Receiving options.
|
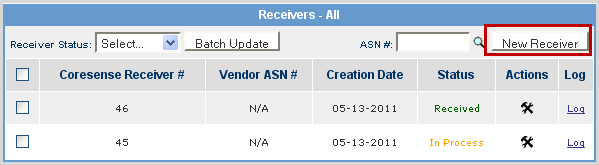
The Receivers-All window shows all receivers associated with a specific Purchase Order. A Purchase Order could have a single receiver associated with it, or it could have multiple.
If you are not using ASN numbers, new receivers are created using the New Receiver button.
|
Step |
Action |
|
1 |
Click on the New Receiver button.
|
|
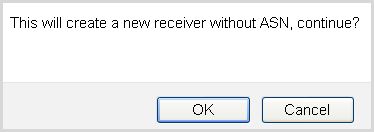
2 |
The system prompts you to confirm the New Receiver creation without an ASN. Click OK.
|
|
3 |
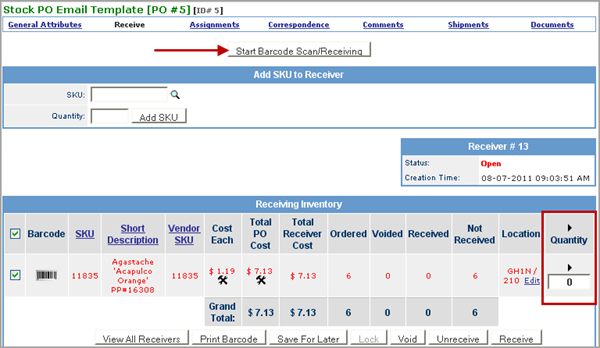
Quantity is entered either using a barcode scanner or manually entry in the Quantity column.
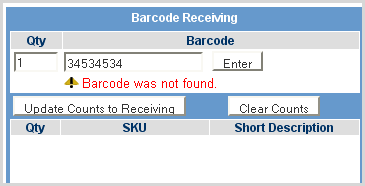
Barcode - if you are setup with barcode scanning, click the Start Barcode Scan/Receiving button. A pop-up window displays allowing you to scan each barcode and enter the quantity. Click here to view pop-up image.Click here to view pop-up image.
Manual - Continue with Step 4 of the process. Note: If product not on PO is delivered, it can be received using the Add SKU button. |
|
4 |
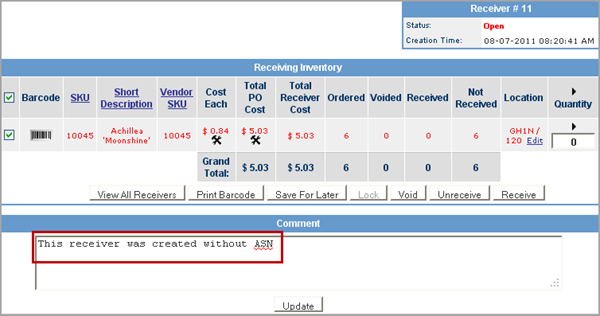
The receiver is created displaying the line items for the purchase order.
Note: The ‘This receiver was created without an ASN’ text in the Comment field can be deleted or overwritten. Click Update after entering new comments. |
|
5 |
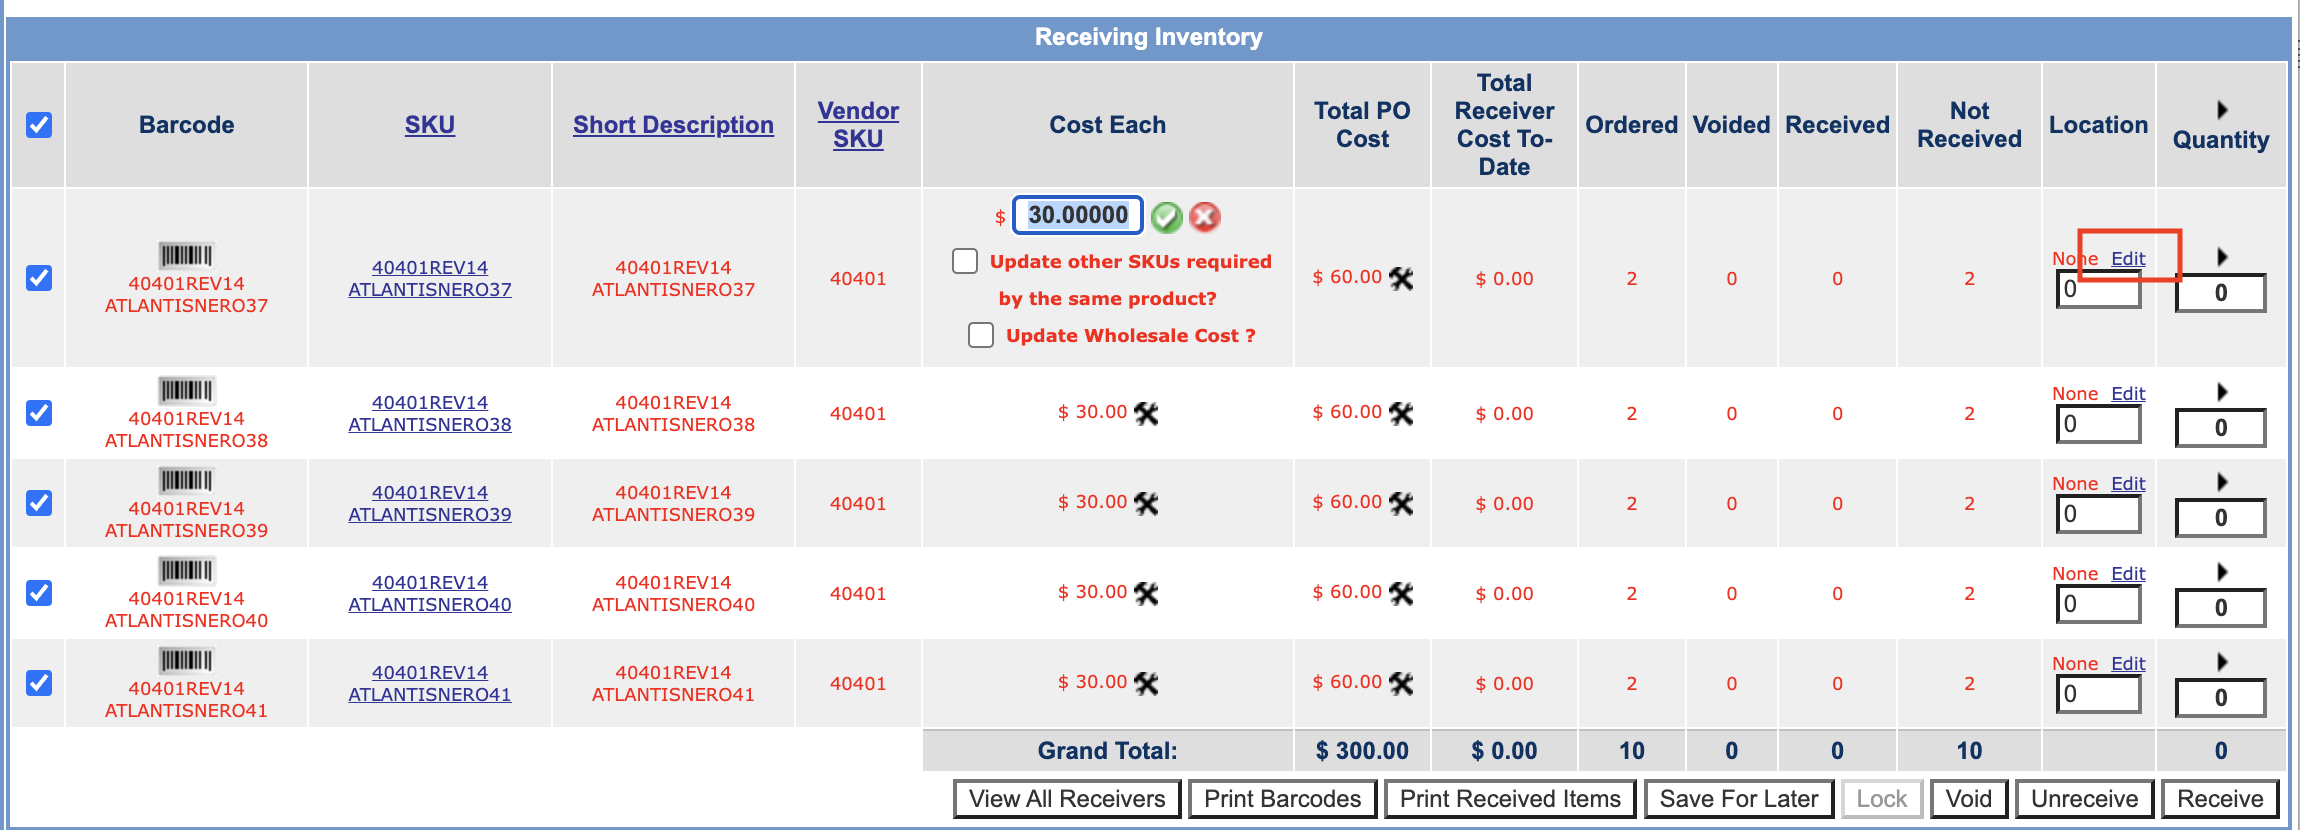
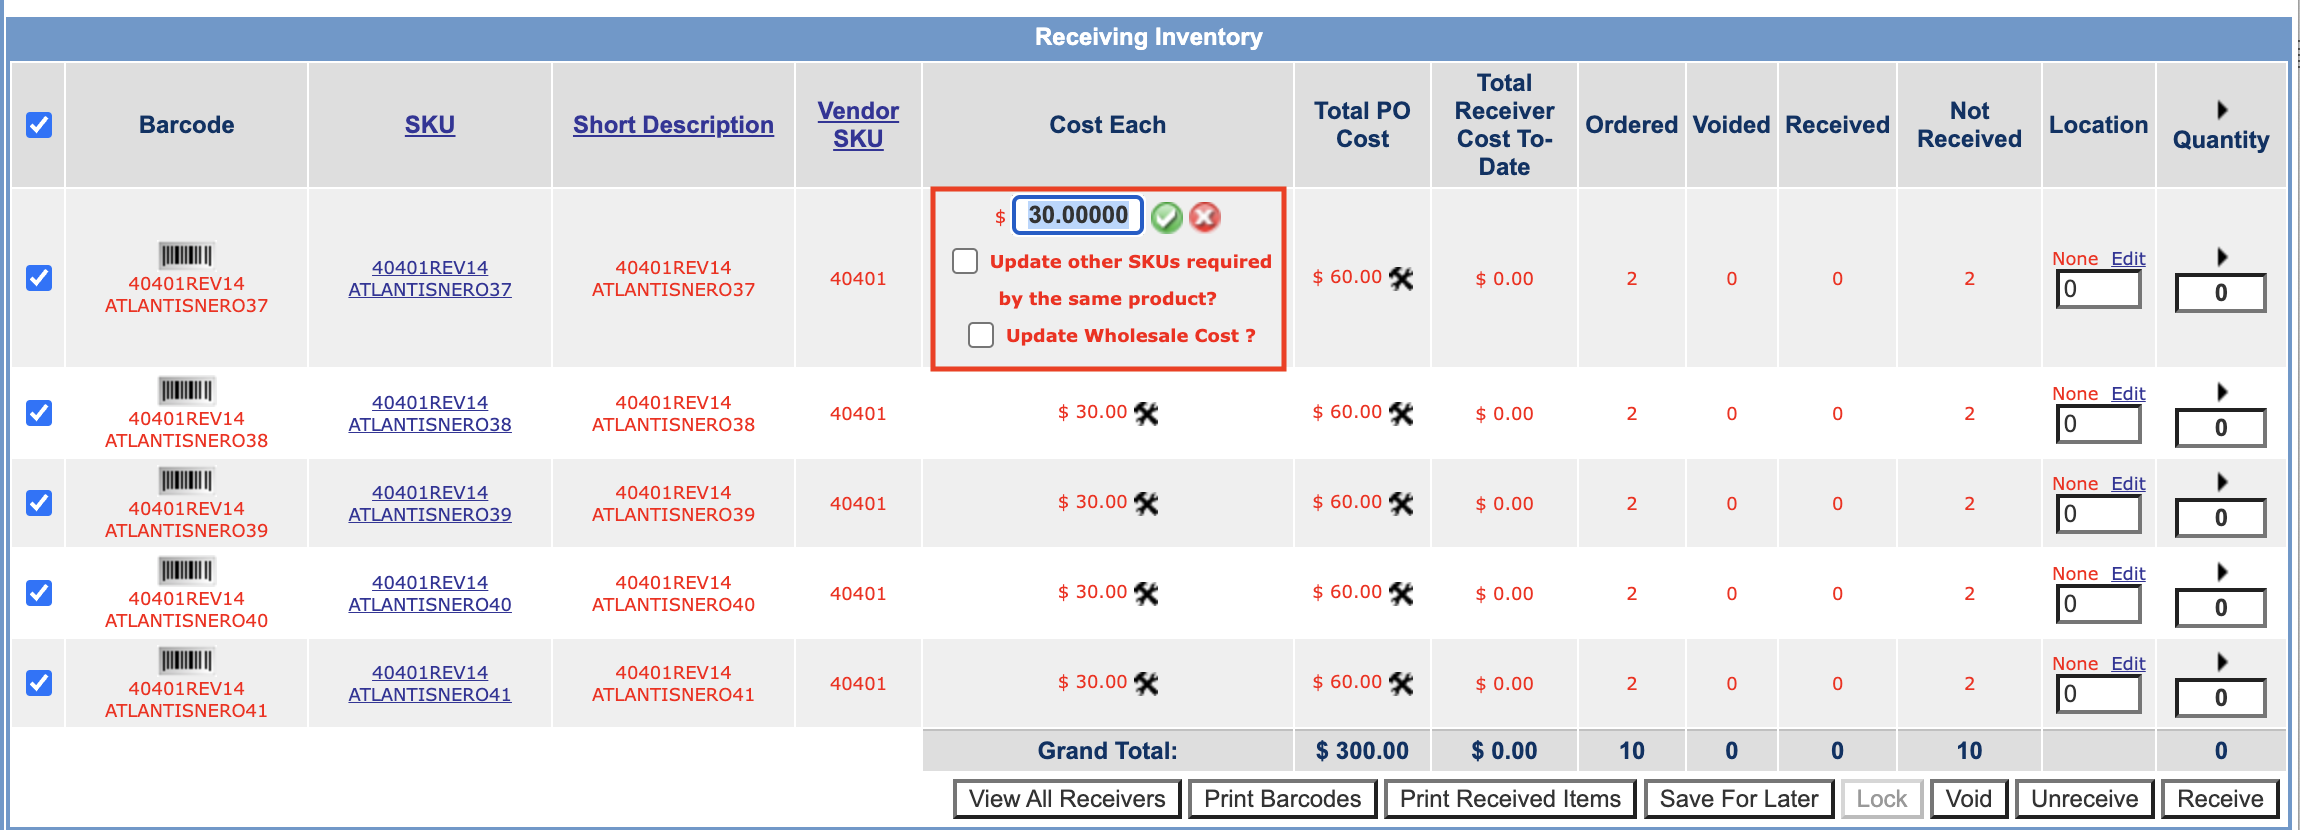
You can edit the received location by clicking the Location link:
|
|
You can edit the received cost of trhe SKU, update the wholesale cost of the SKU to the update receieved cost and update the other SKUs required by the same product.
|
|
|
6 |
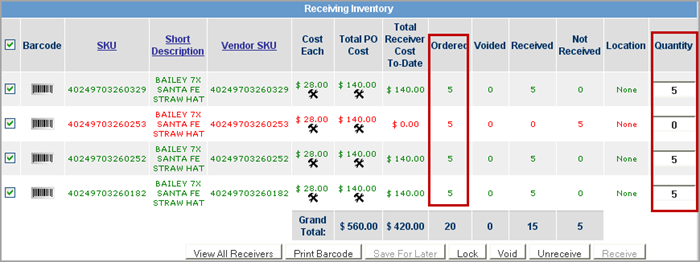
To receive the inventory, if all of the Ordered quantity arrived, click the arrow above the Quantity column and the field automatically populates the quantity. If only part of the order has arrived, fill in the amount manually.
Note: The Status is color coded red until all items are received. If all items are received the color status changes to green. |
|
7 |
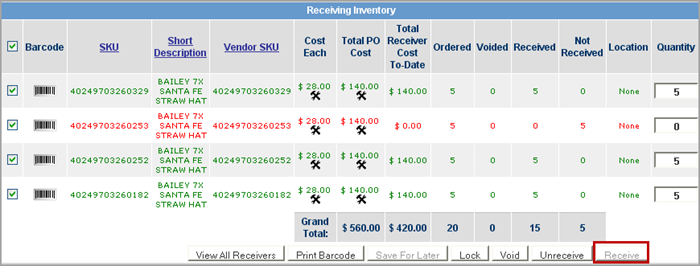
Click Receive to update the amount and the status. In this example only 2 of 6 were received so the status is color coded as a shortage with 4 Not Received.
Note: The remaining inventory needs to be received later using another receiver. |
|
8 |
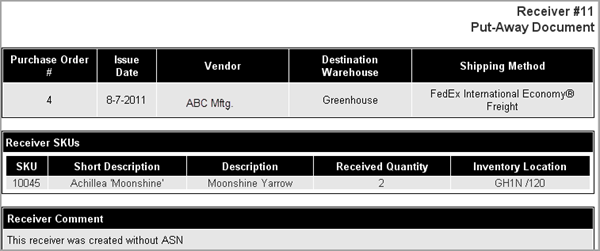
Click on the Generate button to print out the Put-Away document.
|
|
9 |
The received inventory is now ready to be put away into stock as available inventory.
|
|
10 |
The other action buttons that can be used are described below.
View All Receivers - Links to list of receivers created for the current PO. Print Barcode - Use to print the list of barcodes. Print Received Items - Provides the option to print labels for just the quantity of SKUs that have been received. Save for Later - Before receiving any inventory you can save the receiver and work on it later. Lock - Lock the receiver from further actions Void - Voids the receiver and inventory remain in non-received status Unreceive - Used to check inventory back into a non-received status |
|
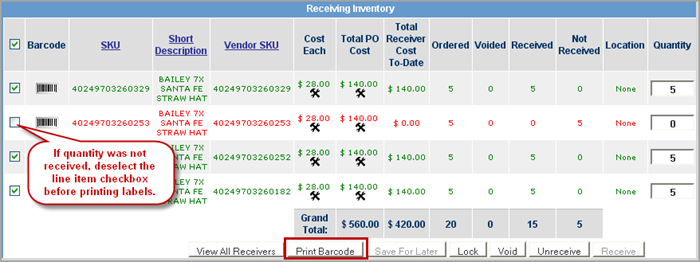
11 |
Click on the Print Barcode button to view the list for label generation.
Tip: If you want to print only the labels for items that were received, deselect the checkbox next to each item with a zero quantity. |
|
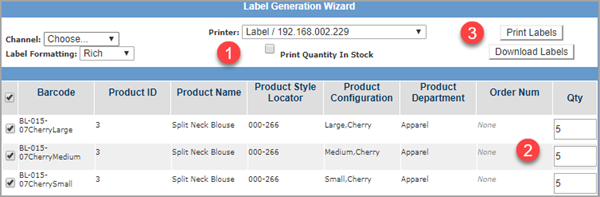
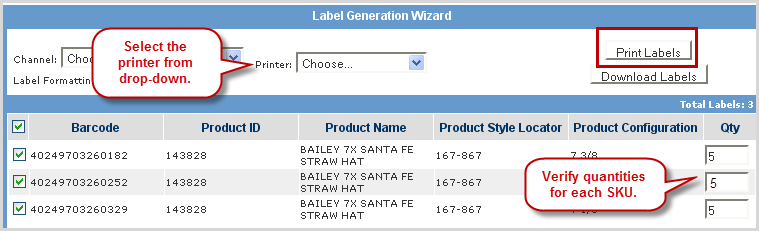
12 |
The Label Wizard displays the checked line items and the matching quantity for each as entered in the Receivers screen.
|
|
13 |
Click on View All Receivers to view PO receiver list and to view the Receiver Log. To open up the Receiver, click on the
Tip: The Receiver Log is also available via the Reporting tab. Choose Reporting > Choose reports > Receiver Log and it can be exported in CSV. |
|
14 |
To close the PO, any remaining inventory needs to be received. Repeat Steps 1-12 to receive any additional inventory for the PO. |
|
15 |
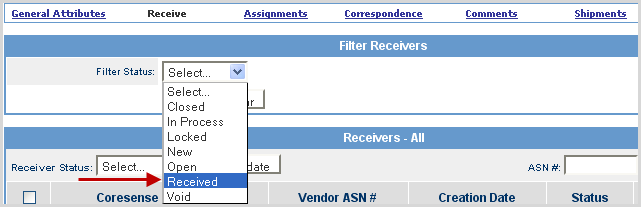
Accounting staff routinely checks the POs and reviews any associated receivers. Using the Filter Receivers section, you can filter on the "Received" status and lock receivers.
NOTE: Only "received" receivers can be used for batch updating. |
|
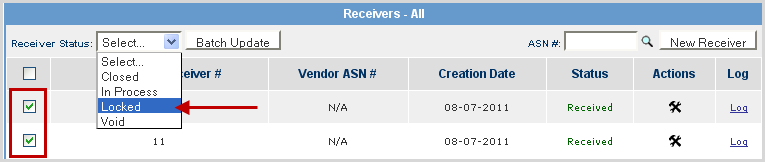
16 |
Check the boxes of the receivers to be locked and select the Locked option from the Receiver Status drop-down. click the Batch Update button to process the update.
|
Barcodes can be printed during the PO receiving process from the Label Generation Wizard.
|
Step |
Action |
|
1 |
From the Receiver, click on the Print Barcodes button.
Print Barcodes button: Selects each barcode's SKU on the PO (each row being separated by order number) MINUS (if available) the amount assigned to the order.) Print Received Items button: Selects each barcode's SKU on the PO (each row being separated by order number) assigned to an order number and uses the minimum number between that number and the amount received overall for that SKU. |
|
2 |
|
|
3 |
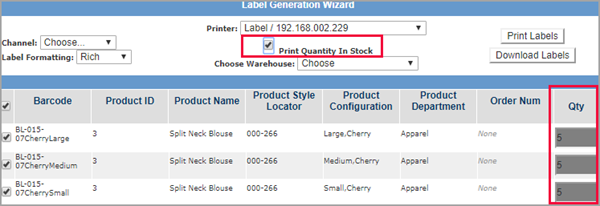
Check the Print Quantity In Stock box to print quantity based on an individual warehouse's current inventory. Choose the warehouse to print that inventory. NOTE: Using this function greys out the Qty field since the system is using the inventory count as the quantity.
|
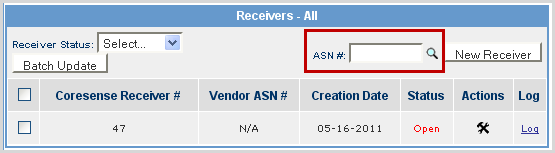
You can search for all ASNs associated with a Purchase Order by accessing the Advance Shipping Notification (ASN) Picker.
|
Step |
Action |
|
1 |
Enter the ASN# into the field or click the
|
|
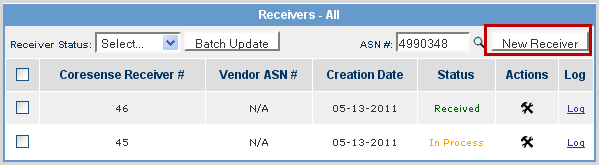
2 |
From the (ASN) Picker window, locate and click on an ASN ID link.
|
|
3 |
The selected ASN ID displays in the ASN# field and will then be associated with the new receiver once the New Receiver button is selected.
|
|
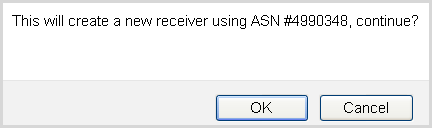
4 |
The system prompts you to confirm the ASN/New Receiver association. Click OK.
|
|
5 |
© 2023 CORESense · info@coresense.com · 125 High Rock Avenue, Saratoga Springs, NY 12866


 icon.
icon.