![]()
![]()
Pricing Groups allow you to set up pricing structure templates based on sales channel and customer tiers. Those templates can then be assigned to individual products. Once a Pricing Group is created, edits can be made to it, which are immediately applied to all products that are assigned that pricing group. To setup a pricing group there are multiple areas of the Back Office that contribute to the workflow:
The System Settings is where you create the customer tier labels that are to be assigned to customer accounts and pricing groups.
|
Step |
Action> |
|
1 |
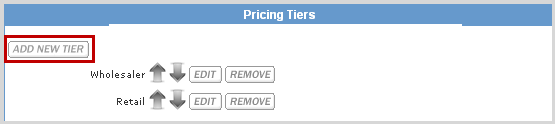
Go to System Settings > Customer Management > Pricing Tiers. |
|
2 |
Click on the Add New Tier button to create a customer tier level, i.e. Wholesaler, Designer, Practitioner.
|
|
3 |
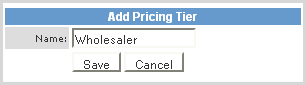
Enter the new label and Save.
|
|
4 |
The customer tier labels are now available to be assigned to customers.
|
|
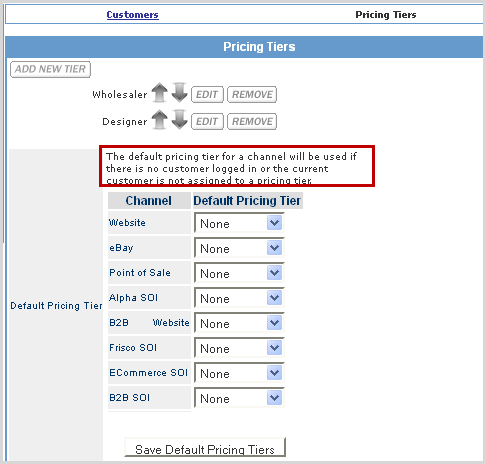
5 |
Once you have created Pricing Groups, you can assign them as defaults to sales channels within the System Settings. Setting a default pricing enables all customers, regardless of Customer Tier label or lack of label, the ability to receive the pricing as defined by that price group.
|
The Customer Manager is where the customer tier labels are assigned to a customer account.
|
Step |
Action> |
|
1 |
Go to Order Processing > Customer Manager > General Attributes. |
|
2 |
Under the Custom Fields section of the General Attributes, select a tier to be assigned to the customer account.
|
|
3 |
Click Update. The customer account is now associated with any pricing group or promotion that includes that Customer Tier. |
Pricing Groups are managed in the Pricing Group Manager. Pricing Groups allow you to set up pricing structure templates and then assign that template to individual products. Once a Pricing Group is created, edits can be made to it, which are immediately applied to all products that are assigned that pricing group.
Click here to learn how to create and manage Pricing Groups.
The Product Manager is where a pricing group is assigned to an individual product. To assign a pricing group to multiple products, see Batch Product Update section below.
|
Step |
Action |
|
1 |
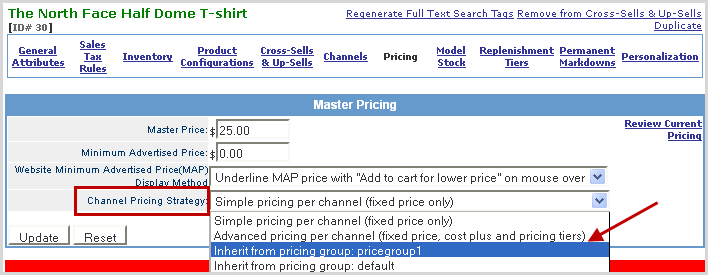
Go to Products > Products Manager > Pricing for a product to assign the pricing group. |
|
2 |
From the Channel Pricing Strategy drop-down, select the Pricing Group you want to assign to this product.
|
|
3 |
Click Update. The product is now assigned that pricing strategy as defined within the values setup in the Pricing Group. |
To assign a pricing group to multiple products, use the Batch Product Update tool.
|
Step |
Action |
|
1 |
Go to Products > Batch Product Update. |
|
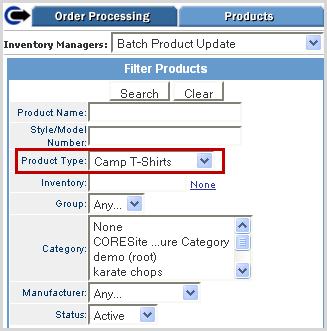
2 |
Search for the collection of products to assign the Pricing Group using the available filters.
|
|
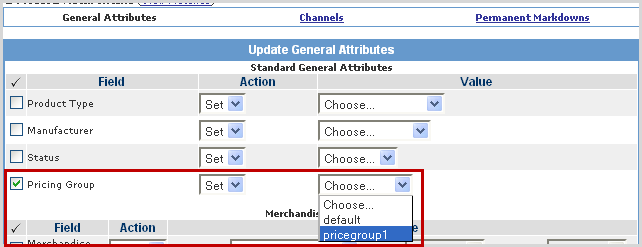
3 |
Check the Price Group option and select the Pricing Group from the drop-down list that is top be assigned to the selected products..
|
|
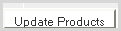
4 |
Click on the Update Products button at the bottom of the screen to save the assignment.
|
© 2023 CORESense · info@coresense.com · 125 High Rock Avenue, Saratoga Springs, NY 12866