![]()
![]()
User permissions and roles are controlled from the User Account Manager.
Path: Back Office > Setup > System Settings > User Account Manager
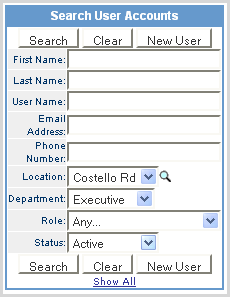
Use the Search User Accounts box to find existing user accounts. Enter any parameters you want in the available fields and click Search. You can also select Show All.

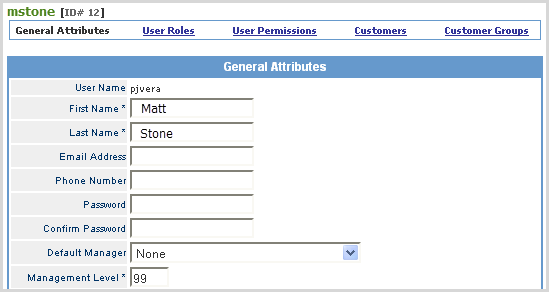
You can update an individual account by clicking the ![]() icon for that person under the Actions column. Make the necessary changes in the General Attributes fields and click Update User to submit changes.
icon for that person under the Actions column. Make the necessary changes in the General Attributes fields and click Update User to submit changes.

Passwords can be changed here by an administrator but the password is not stored at this location. Individual users should change their password using the "person" icon next to the Accounting tab.

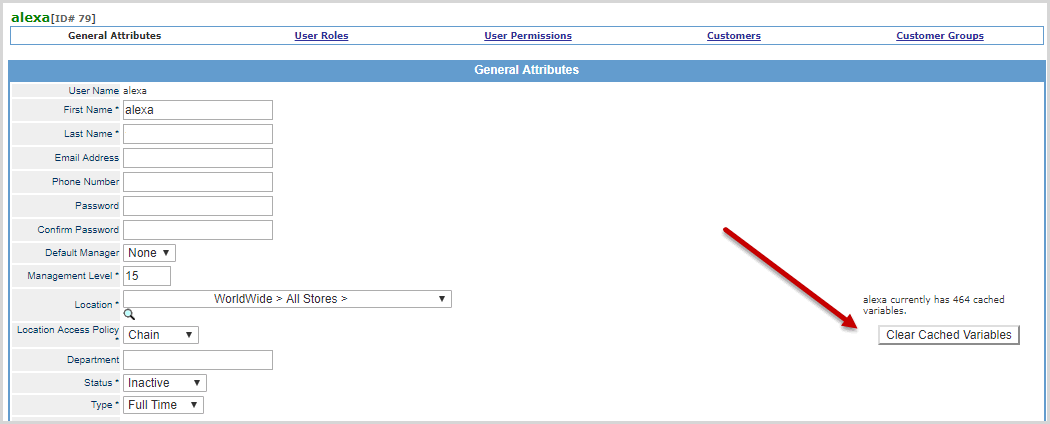
Cached variables can be cleared by clicking on the Clear Cached Variables button per user. This is useful if the user is experiencing slowness in the Back Office and default searches within any of the managers. Clear Cached Variable button does NOT save user account information, instead account information is only saved when using the Update User button.

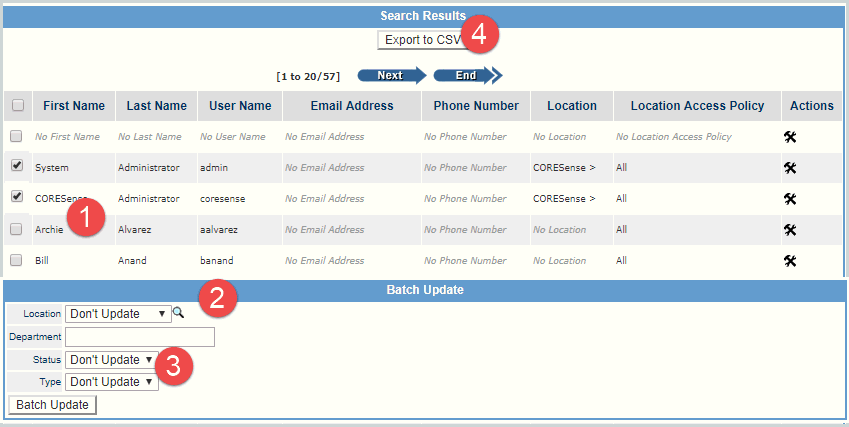
You can use Batch Update to update a selected group of user accounts simultaneously. Batch Update allows you to change the Location, Department, Status and Type for the selected group of user accounts. Complete the steps below to perform a batch update.

|
Step |
Action |
|
1 |
Check all of the accounts you wish to change in the Search Results window under the Select column. Check the Select checkbox to select all user accounts. |
|
2 |
Make your changes from the options provided in the Batch Update section. |
|
3 |
Click the Batch Update button to save your changes. |
|
4 |
Use the Export to CSV to review search results in a spreadsheet format. |
Follow the steps below to create a new user account.
|
Step |
Action |
|
1 |
Click the New User button in the Search User Accounts box. The User General Attributes screen displays.
|
|
2 |
Fill in the information for all the required fields (*).
User Name = the name the user will use to log onto the system First, Last Name = user's first and last name Password = assign a temporary password until the user signs in and changes it using the Personal Settings Management Level = The level assigned to user that allows them to override system functions. The default is 5, so enter a higher number for users who should be granted more access, or a lower number to limit user access to permissions. Location = The level of access to store, district, region, or chain information across your Location Hierarchy. Location Access Policy = Based on the Location assigned to the user, the related Location Access Policy should be assigned. Each policy identifies the warehouse, POs, shipments, and transfers level the user would have access to. Status = Current activity level of the users Type = Identifies type of users as FTE, Part-time, contract, etc. Brand Access = The brands the user has access to. Brand Access control limits the user to accessing channels associated with the selected Brand(s) and customers and orders that were originated in a channel under the selected Brand(s). Comments - Internal comments.
Before enabling, the Google Authenticator app must be installed on your phone so that you can scan the QR code. Refer to Google documentation for loading and using the Google Authenticator application on your phone. |
|
3 |
From the Status drop down, choose the Active option for the new user.
|
|
4 |
From the Type drop down, choose the appropriate user type option for the new user.
|
|
5 |
Select all Brands the user is to have access to within the Back Office. Brand assignment limits the user to order and customer information for the specified brands. |
|
6 |
Enter any Comments for internal tracking related to the user. |
|
7 |
Click Create User and the new user account will be visible in your list of user accounts the next time you search. |
After you have created a user, you assign that user a Role within your organization. Follow the steps below to assign a role to a user.
|
Step |
Action |
|
1 |
Search for the user and from the Search Results, click on the |
|
2 |
Click the User Roles link to access the list of user roles.
|
|
3 |
Use the arrow buttons to move a desired role from the Available pane into the Current pane.
|
By default, users receive whatever permissions have been assigned to the role they are assigned within your organization’s framework. These permissions can be modified on an individual basis.
Users cannot assign permissions to themselves.
Permissions can only be assigned to users by another user who already has the permission(s) being requested.
|
Step |
Action |
|
1 |
Search for the user and from the Search Results, click on the
|
|
2 |
Click the User Permissions link to access the list of user permissions.
|
|
3 |
The system displays all the permissions associated with the roles assigned to the user and a list of all other available permissions. Use the arrow buttons to move a desired role from the Available pane into the Current pane.
|
Note: For companies with multiple locations, permissions can also be granted based on those locations. See Location Hierarchyfor more information on that.
Depending on your sales team setup, you can choose to have individual users assigned to specific Customers. You can use this to ensure that customer relationships are maintained by only identified staff, which is useful for commission-based sales programs.
|
Step |
Action |
|
1 |
From the User Account screen, click on the Customer link to assign a Customer to a user.
|
|
2 |
Click the
|
|
3 |
Enter Search criteria in the Filter Customers box and click Search. Select the desired customer from the results list by clicking on the Cust # link.
|
|
4 |
Enter or search for the customer id number and Click the Add Customer button.
|
|
5 |
The customer is now assigned to the user. Add additional customers as needed. Click
|
Depending on your sales team setup, you can choose to have individual users assigned to specific Customer Groups. You can use this to ensure that customer relationships are maintained by only identified staff, which is useful for commission-based sales programs.
Note: Customer Groups are created in the Back Office technical Configurations.
|
Step |
Action |
|
1 |
From the User Account screen, click on the Customer Groups link to assign a Customer Group to a user.
|
|
2 |
Click the
|
|
3 |
From the list of groups, click on the name link of the one you want to assign to the user.
|
|
4 |
The Group D prefills. Click the Add Customer Group button.
|
|
5 |
The Customer Group is now assigned to the user. Add additional groups as needed. Click
|
© 2023 CORESense · info@coresense.com · 125 High Rock Avenue, Saratoga Springs, NY 12866