![]()
![]()
Model Stock is the inventory level of a particular product that is always wanted in a given store, district, region or throughout an entire chain. Setting the Model Stock sets the auto re-order levels for all SKUs related to a given product based upon the associated location.
Reorder automation system located in Products > Inventory is used for non-grid products.
|
Location Hierarchy |
Inheritance Relationship |
|
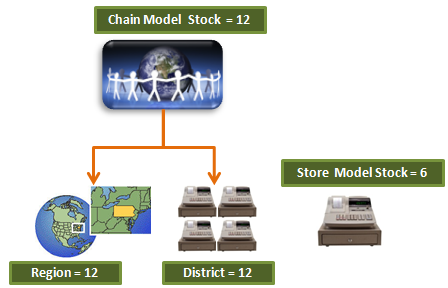
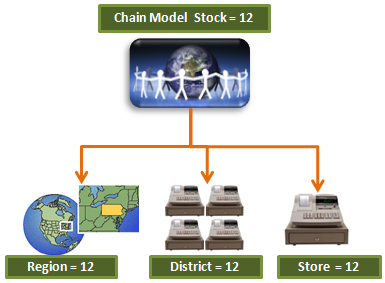
Model Stock uses inheritance from the highest designated location. For example, if Model Stock is set at Location Hierarchy = Chain, then all sub-locations of the Chain inherit the assigned Model Stock values for replenishment. |
 |
|
If the Model Stock is set at a lower hierarchy level, Location HierarchyStore, then the system uses that designated Model Stock for that location and the Chain designated Model Stock for all other locations for replenishment. |
|
Follow the steps below to set the model stock quantities for a product.
Path: Back Office > Products > Model Stock
|
Step |
Action |
|
1 |
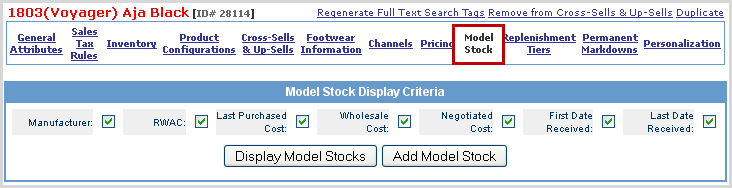
After selecting a product, click on the Model Stock link from the Products Main Menu. |
|
2 |
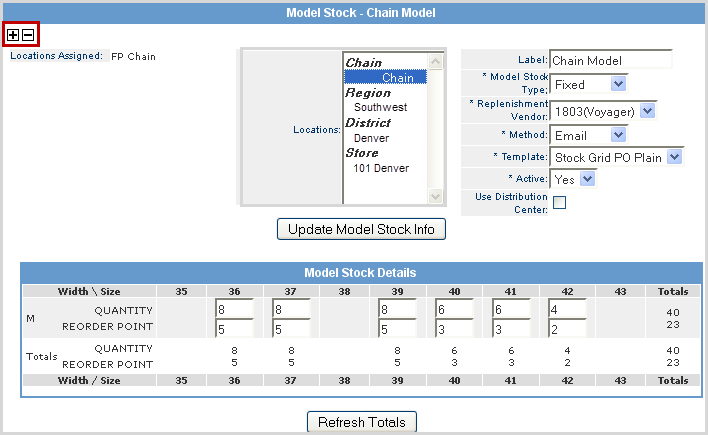
Click the Add Model Stock button to access the Model Stock entry fields as described below.
|
|
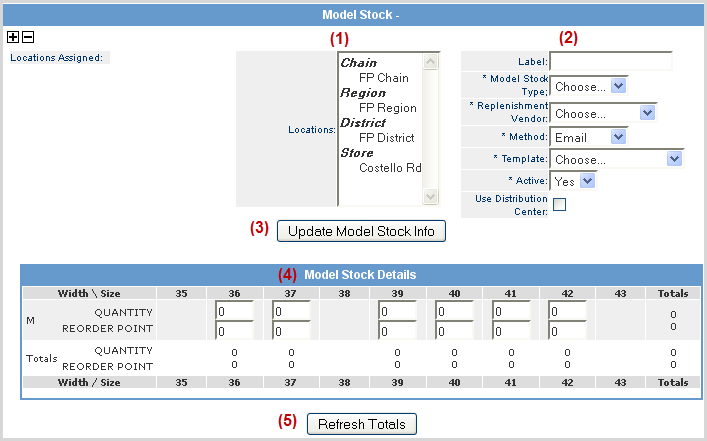
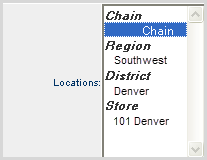
3 |
Click on the Location of the model stock to be assigned. In order to have locations available for Model Stock, you need to update the following fields in the warehouse manager for each store (location): 1. Available for Fulfillment: = yes 2. Location Hierarchy is assigned at the store level
Important: If Model Stock is set at the Chain level, that value is inherited for all other location levels unless otherwise specified. |
|
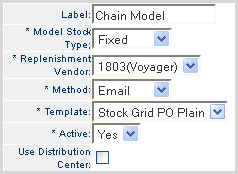
4 |
Select the Model Stock attributes for the location as described below. Label - Enter a descriptive label for the new Model Stock. Model Stock Type – Select whether to use a fixed quantity or an up-to quantity for reordering.
Replenishment Vendor – Select the vendor to auto-reorder from. Method – Select the method in which to notify the vendor for reorders. Template – Select the notification template that will be sent to the vendor. Active - Identify whether the Model Stock is active or inactive. Use Distribution Center - Check this if you want to replenish stock from your Distribution Center, which generates an internal transfer. If left unchecked, the system kicks off a PO to the designated vendor. |
|
5 |
Click Update Model Stock Info to save the attribute data. |
|
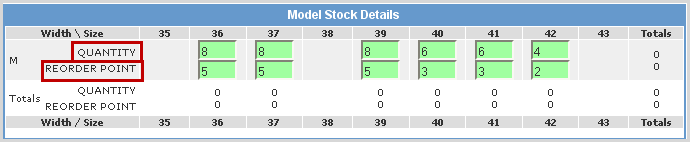
6 |
Enter the base Quantity and replenishment Reorder Point quantity for each configuration. Note: These are the totals that are used for auto re-ordering when no Replenishment Tiers have been established. |
|
7 |
Click Refresh Totals to save the quantities entered. The system prompts you to confirm your entries, click OK. |
|
8 |
Click on the |
|
9 |
Additional Model Stocks can be added to the product by clicking on the |
Follow the steps below to view the current status of your Model Stock quantities.
|
Step |
Action |
|
1 |
After selecting a product, click on the Model Stock link from the Products Main Menu. |
|
2 |
Review the Model Stock Display Criteria options and un-check any that you do not want displayed. Manufacturer: product manufacturer RWAC:the running weighted average cost Last Purchased Cost:price when last purchased Wholesale Cost:non-retail, wholesale price Negotiated Cost: equals wholesale cost( - ) discount percent. Example: wholesale = $10.00, Discount is 20%, equals Negotiated Cost = $8.00 First Date Received:date product was first received from vendor Last Date Received:date product was last received from vendor |
|
3 |
Click on the Display Model Stocks button and product information is displayed in the Related Product Information box. This data is for informational purposes only.
|
|
4 |
All existing Model Stock setups are listed below. Click on the on the
|
|
5 |
Once Model Stock thresholds have been met, POs are generated and are available in the PO Builder for review. The system will group products by vendor, warehouse and shipping method per PO. There is a nightly cron that runs that updates any new model stock thresholds and adjusts the recommended PO queue accordingly. The recommended POs will sit there until they are manually pushed to vendors, there is no automatic send to a vendor. |
© 2023 CORESense · info@coresense.com · 125 High Rock Avenue, Saratoga Springs, NY 12866