![]()
![]()
Product configuration options that are available to customers when purchasing a product, such as color, are organized as Standard and Upgrades in CORESense. For Grid-based products, product configurations are generated when a product is entered into the system and a grid is applied to it using the New Product Wizard at Step 1.
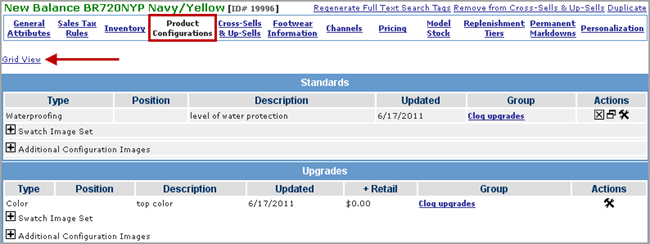
The Product Configurations screen is where you can view and edit configuration information by click on either the Classic View or Grid View links. The default view is Classic.

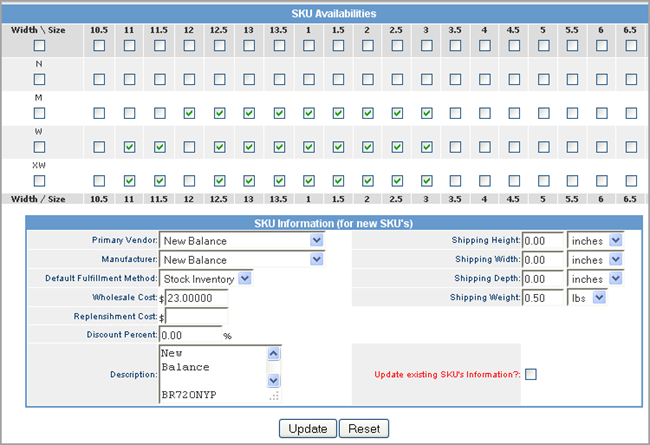
The Grid View is comprised of two sections, SKU Availabilities and SKU Information.

SKU Availabilities displays all the possible axis configuration combinations for the product. SKU Availabilities prevent the ordering of something that is not available, and allows the auto-generation of SKUs. Auto-generation is initiated when an unchecked option is checked for the first time. In the case that an option (SKU) already exists, but was disassociated from a product by a prior action, the association to the SKU Availability is re-established and another SKU is not created.

The boxes checked indicate the available SKUs for this product.
The combinations can be edited by adding check marks for newly available combinations, or removing check marks for configurations that are no longer sold.
To remove an axis value from the grid view (and purchasing view), go to the specific grid in the Grid Manager and delete it. The value is no longer displayed for the Product Manager or the PO Builder.
To check or uncheck a whole row or column, click on the desired value on the X or Y axis (along red arrows).
Click Update at the bottom of the screen to save the changes.
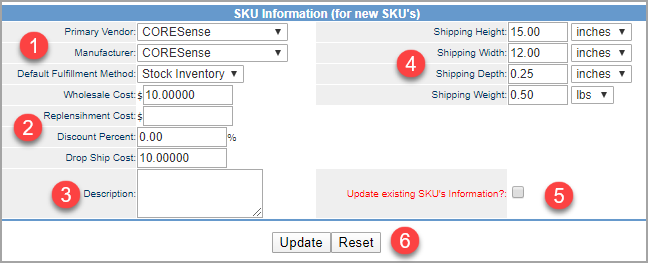
The SKU Information box displays basic details pertaining to all of the SKUs.

Make any needed changes to the available drop-down lists.
Type in any new Cost or Discount Percent information.
Update the description.
Include any shipping dimensions that are needed.
Click the Update existing SKU’s Information? check box if the changes are to be applied to all SKUs, otherwise the updates are applied to only the new SKUs just added in the SKU Availabilities section.
Click Update to save the changes.
Important: If the Update existing SKU’s Information check box is selected, then all SKUs are updated with the defined values that were set in the SKU Information section. This overrides and replaces any existing SKU data.
If an Upgrade has a + Cost defined then when Update is clicked to update all skus vendor costs, the + Cost adder from the Classic view will be maintained and the combined cost - replenishment or whole sales plus the + Cost - will be reflected for that sku.
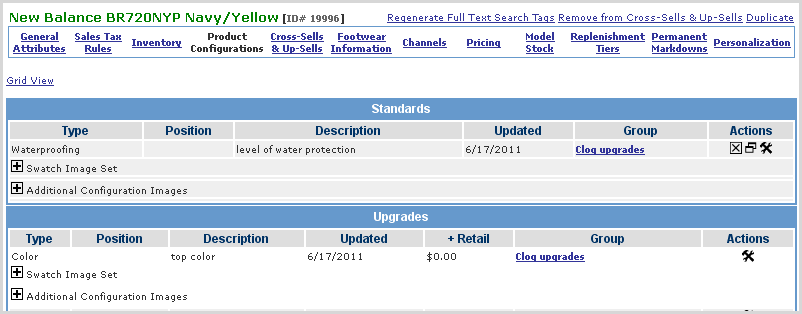
The Classic View presents the product configurations and SKU information in a list format and is organized in the Standards and Upgrades sections. It also allows additional images to be added to the product.

There are three primary functions within the Standards section:
Perform Actions against the product such as Delete, Duplicate or Edit
Attach Swatch Image sets for the product
Attach additional images of the product's configuration

|
Step |
Action |
|
1 |
If a standard has been applied to a group of products, the group name displays under the Group column. It links to the Group screen, which consists of the list of all products that the standard is applied. |
|
2 |
Under the Actions column you can perform the following tasks:
|
|
3 |
To add swatch images for the standard (color, texture), click on the |
|
4 |
To add more product configuration images for the standard, click on the
|
The Upgrades section lists all the current product configurations in a list format. Each configuration can be edited by clicking on the![]() icon. This is only used to edit the Position and the Additional Retail price of an Upgrade. All other attributes are controlled by the Grid.
icon. This is only used to edit the Position and the Additional Retail price of an Upgrade. All other attributes are controlled by the Grid.

|
Step |
Action |
|
1 |
Under the Actions column, click on the
|
|
2 |
To add swatch images for the upgrade (color, texture), click on the
|
|
3 |
To add more product configuration images for the upgrade, click on the
|
© 2023 CORESense · info@coresense.com · 125 High Rock Avenue, Saratoga Springs, NY 12866