![]()
![]()
Step 1 of New Product Wizard addresses the following product data components:
Grid Attributes (if applicable)
From the Back Office, go to Products > Product Manager. In the Search/New Product section, click the Launch New Product Wizard button.

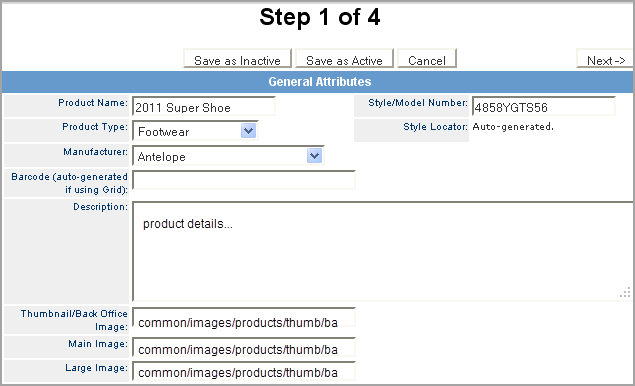
The Step 1 screen displays the CORESense standard product General Attributes. These fields are described below.
|
Field |
Description |
|
Product Name |
Name of product that you entered |
|
Style Locator |
Auto-generated |
|
Manufacturer |
|
|
Style/Model Number |
Used for informational purposes such as searching and reporting, as well as an entry value in interfaces such as cross-sells and up-sells, as such, the value should be unique. |
|
Product Type |
|
|
Barcode |
Auto-generated (can be overwritten in the Barcode Manager. ) |
|
Description |
The product description. HTML can be included in the description |
|
Thumbnail / Back Office Image |
The product thumbnail image is displayed on the website category page, product page,search page and the homepage to feature specific products.
For example, if the image URL is http://www.corestore.com/common/images/products/thumb/baseball.gif, then the relative image path is common/images/products/thumb/baseball.gif.
|
|
Main Image |
The main product image is most commonly used as the primary image on the website product page.
|
|
Large Image |
The large, more detailed product image is most commonly used as a secondary image on a product page to provide a clearer view (zoom) of a product or product detail.
|
|
Alt Images |
Provides alternative presentation of product such as Top, Bottom, or Back views. Each alternative can have its own Thumbnail, Main and Large image file. |
|
Remaining Fields |
The remaining fields shown above, Material, Color, Season, Commission Rate, Commission Rate Type, Media Enabled, DOT, Markdown, are all examples of custom fields defined per CORESense Implementation. These may be text boxes, or single- or multi-select drop-downs. To add or update Custom General Attributes, contact CORESense support. |
These components are only applicable to clients utilizing CORESense Grid functionality. They reference the available grid that can be applied to a product based upon the product's selected product type and manufacturer combination. Select an available grid from the drop-down list for assignment to the new product being created.

The available SKUs that can be created based upon the grid assigned to the new product display once a grid is selected. Select the check box(es), based upon the Grid Axis, to define the configurations available when the product is created.

Note: See Grid Manager for more information about setting up and managing grid products.
Within CORESense, the Merchandise Hierarchy feature is designed to allow retailers to organize data in a true retail fashion. It gives retailers the ability to group products into a series of levels or divisions, typically referred to within the industry as a <b style="font-weight: normal;">hierarchy</b>.</p>
Merchandise is organized into Departments, Classes and Sub-Classes, however, these titles can be customized. This approach makes it easier for retailers to analyze and manage sales.
The Merchandise Hierarchy section within Product Manager enables new products to be assigned to previously created merchandise hierarchies.
Select the desired Merchandise Hierarchy options via the drop down boxes.

Tip: See Merchandise Hierarchy Manager for more information about adding or modifying the values provided.
Sales Tax Rules define the condition and amount of sales tax collected at the time of purchase. A retailer can choose to enable one or more sales tax rules for a product. The Tax Rules section lists all available Sales Tax Rules.
Tip: See Sales Tax Manager for more information about setting up sales tax rules.
Follow the steps below to assign the needed tax rules to a product.
|
Step |
Action |
|
1 |
Identify the appropriate rule(s) for the product under the Tax Label column, and check the associated checkbox.
|
|
2 |
The State column identifies which order shipping state the rule applies. |
|
3 |
The Zip column identifies which order shipping zip code the rule applies. If the order shipping state matches, but the zip code does not, the sales tax rule does not apply. |
|
4 |
The Rate identifies the sales tax percentage used to calculate the sales tax amount. |
Tip: Go to Setup > System Settings > Merchandise Hierarchy Manager > Products to perform bulk product sales tax rules updates.
Cross-Selling and Up-Selling is used to sell additional merchandise for a product that is either a related product, or higher priced version of the product being viewed.
A Cross-Sell is a product relating to the product a customer added to their shopping cart.
Typically the Cross-Sell is an accessory, or a complementary product with similar attributes. For example, a stereo may Cross-Sell a recommended speaker system.
A Cross-Sell is displayed in the shopping cart once a product is added to the order. This is particularly useful on a website or Point of Sale.
An Up-Sell is typically a higher priced product relating to the product a customer is viewing; such as a more expensive version or model. For example, a two-burner Weber Grill may Up-Sell the three-burner version, a higher priced product.
An Up-Sell is displayed adjacent to the product on the website product page.
Follow the steps below to add a Cross-Sell or Up-Sell product.
|
Step |
Action |
|
1 |
From the Product Accessories box, enter the Product ID or Part Number.
For help searching for the desired product, click |
|
2 |
Enter the search parameters, then click Search. In the Search Results, click the Product Name, to enter the Product IDin the Product ID field.
|
|
3 |
Click Add. The Cross-Sell displays in the Product list section. Repeat these steps for all Cross-Sells to be added. Products are ordered according to the sequence in which they were added.
|
|
4 |
Click the |
|
5 |
From the Related Products box, enter the Product ID or Part Number.
For help searching for the desired product, click |
|
6 |
Enter the search parameters, then click Search. In the Search Results, click the Product Name, to enter the Product IDin the Product ID field. |
|
7 |
Click Add. The Up-Sell displays in the Product list section. Repeat these steps for all Up-Sells to be added. Products are ordered according to the sequence in which they were added.
|
|
8 |
Click the |
The New Product Wizard allows t he user to navigate back and forth between steps and choose to save the new SKU and/or product at any time. Only the information entered in the steps is saved to the new product.

|
Button |
Action |
|
Save as Inactive |
All entries are saved but product is not yet available for purchase on sales channels. |
|
Save as Active |
All entries are saved and the product is available for purchase on sales channels. |
|
Cancel |
product information is not saved and deleted from system. |
|
Next |
All information entered is saved and the Wizard moves onto the next step. |
Important: If adding a product with product configurations (standards and upgrades, it is recommended to only complete Steps 1, 3 and 4. By skipping Step 2, a new SKU is not created or related to the new product. Once complete, use the Add Product Configurations, Create New SKUs, and Create SKU/Inventory Relationships steps from the Standard Method.
© 2023 CORESense · info@coresense.com · 125 High Rock Avenue, Saratoga Springs, NY 12866


